Traverse Global v11.2
Receive
Use the Receive function to record the items you receive, their quantities, and the orders for which you received them. You can receive items for purchase orders, warehouse management transfers, and sales order RMAs, as well as warehouse and project costing material requisition returns.
You must confirm the entries you have made before this function will update item quantities in Inventory and transactions in Purchase Order, Sales Order, Project Costing, MFG-Production, Warehouse Management or Shipments. When you click the Confirm button on the Receive screen, WMS updates item quantities and transaction status, as needed.
- If you receive items for purchase orders or RMAs, WMS updates item on-hand quantities, updates the order with the receipt information, and changes the status to Goods Received for the orders you select.
- If you receive items transferred from another warehouse, WMS changes the on order quantity for that item to on hand for the destination location and sets the transfer's status to Completed.
Note: If only partial quantities were shipped from the source location (for example, 5 widgets were shipped instead of the requested 10), WMS does not change the transfer's status to Picked. The system uses this status only when the entire quantity for the transfer has been shipped. Only transfers with a status of Picked appear in the list of orders for which you can receive goods. If you received a partial shipment for a transfer, you need to manually change its status to 'Picked' in order to apply the items you received for that transfer. Alternately, you can wait until you receive the entire quantity, then enter the receipt and complete the transfer. - If you receive items for a material requisition return, WMS updates the extended cost and Filled quantities for the return and updates the on-hand quantity in Inventory for the items you received.
- The default receiving bin will be set automatically based on the user's or location's default receiving bin. A receiving bin is typically not a stocking bin, and you can use the Put Away function to move items from a receiving bin into a regular stocking bin. You can skip this step by receiving items directly into their regular stocking bins (Receive and Putaway Together = 'Yes').
- Non-stock inventory is supported; however, the receipt of a non-stock item is treated as a 'receive and put away together' action. The Put Away function does not support non-stock items.
-
You can receive a Shipment without running the Landed Cost Calculator.
- Use these buttons to:
Select To Confirm Approve entries and update Inventory item quantities and the transaction status. Print Print receiving labels using the receiving label style specified in the WM business rules, if available. Refresh Refresh the data. Activity Display the Activity Log to view activity. Receive All Automatically receives all listed items to the default receiving bin(s).
Workflow
There are two main actions performed during the receiving process:
- Receive: receive the item(s) from a vendor, production floor, or customer (returns) into a receiving bin
- Put away
 The process of moving an item from a receiving bin into a separate stocking or storage bin.: move the received item from the receiving bin to a regular storage bin
These actions can be performed in separate steps or together in one combined step. The WM business rule, Receive and Putaway Together, determines if the receive and put-away actions are combined or performed separately. By default, the Receive and Putaway Together business rule is set to 'No', which allows the receive step and the put-away step to be separate.
At the confirmation step of the receiving process, you have the option to select whether to perform a two-step receiving process (Receive and Putaway Together = 'No') or a one-step process that receives into the inventory stocking bin (Receive and Putaway Together = 'Yes'). The option will default to the business rule setting.
Process A: The Receive and Putaway Together business rule is set to 'No'.
Start -->Receive (into a receiving bin) -->Put Away-->End
The receiving and put-away functions are two steps in this case. First, the receiving staff receives the item(s) into a receiving bin. When receiving items, the system will suggest the default bin from the source transaction (PO), or the default bin from the IN Item/Location, or the IN Location default receiving bin, whichever value is found first. You can choose a different bin. Then the put-away staff moves the item(s) from the receiving bin to a separate stocking bin.
For example: If the user who is receiving the items is NOT putting them into a stocking bin right away but into a receiving bin instead, s/he can choose the bin where s/he is putting the product (in an ideal world, a bin with a bin type of 'Receiving'). At the time of ‘Confirm’, the user must leave the ‘Receive and Putaway Together’ check box clear. This assumes that the product will be placed into the stocking bin later, using the Put Away function.
If you choose to perform a two-step receiving process (Receive and Putaway Together = 'No'), the item is received into a 'receiving' bin, which may or may not be a receiving-type bin. To determine if/which items are available to be put away into stocking bins, use the Put Away function.
Items received into a receiving bin are considered "in stock" and will be included in on-hand quantities for the items, as well as available to issue/pick to satisfy demand. If you do not want items in a receiving type bin to be available to satisfy demand, mark the Quantity On Hold Y/N check box for the receiving type bin in the WM Bin Type function.
Note: You can invoice and post PO Transactions either before or after you use the Put Away function to put items into stock.
Process B: The Receive and Putaway Together business rule is set to 'Yes'.
Start ----->Receive (into a stocking bin) ----->End
The receiving and put-away steps are combined into a single step. If an item is received directly into a stocking bin, there is no need for a separate put-away step.
Note: Invoice and post PO Transactions after you receive items to stock.
Remember, you can add columns to the grid using the Column Chooser.
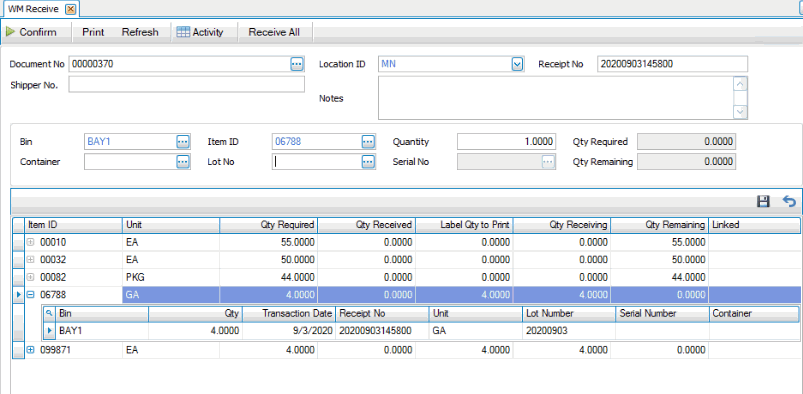
Receiving
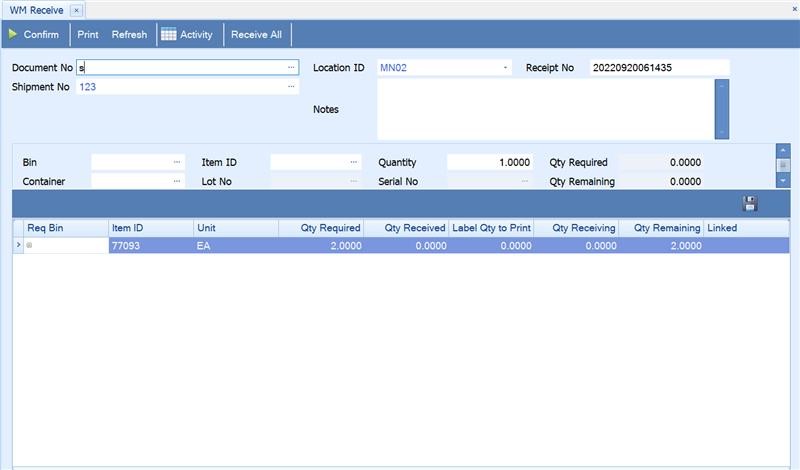
- Select an order number for which you are receiving goods from the Document No field. Orders that are fully received will not appear in the list. You are allowed to select Shipment No or Document No.
- Accept or select the Location ID for which you are receiving items.
- The Receipt Number is generated automatically by the system. Edit the receipt number, if necessary.
- Select a shipment number from the Shipment No field. The shipments in the status of New, In Process and Received are available for the selection. Items and Quantities can be loaded from the Shipment function.
- Enter information about the items you are receiving using the BOL and Note fields, as necessary. The PO Receipt will be updated with this information when the receipt is confirmed.
- The default receiving bin number appears in the Bin field. Accept or select a different receiving-type bin from the drop-down list. To see bins of any type, such as stocking/regular (not just receiving types), remove the filter on the drop-down list.
In the grid, a Req Bin (required bin) column displays the line item bin from the purchase order if the source is 'PO'. If the source for the item(s) to be received is other than a PO, the field will display the item/location default bin if available, or the inventory location default bin. The required bin is the bin into which the item is moved when you perform the put-away process (receiving bin) if you choose a two-step receiving process (Receive and Putaway Together = 'No'). The required bin is the stocking bin into which the item is moved when you perform a one-step receiving process (Receive and Putaway Together = 'Yes')
- Select an Item ID to receive from the drop-down list or the grid. Alternately, use the Receive All button to receive all items listed at once.
- Accept or enter the Quantity of the item you are receiving. The Qty Required and Qty Remaining fields are read-only.
- Accept or select a receiving Unit of measure. The unit of measure should be the base unit of measure.
- Select a Container from the drop-down list, as applicable.
-
If the item is serialized, lotted, or serialized and lotted:
Serialized Item
- Enter the Serial No for the item received. If there is more than one serialized item to receive, once you enter a serial number, the Generate Serial Numbers screen will open and suggest the next serial numbers in sequence. Accept or edit the First Serial Number, and use the Evaluate button to see the resulting serial numbers generated. If the serial numbers are acceptable, use the Generate button to create and assign serial numbers to the items you are receiving.
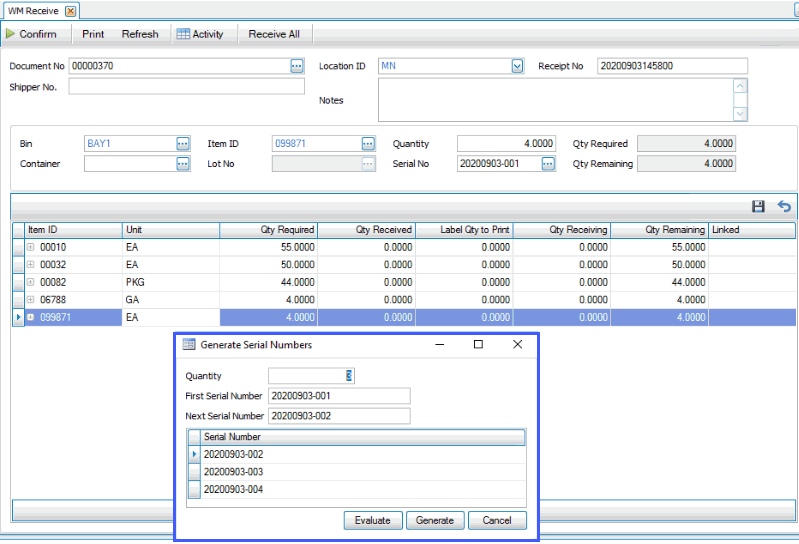
Alternately, if you receive a Quantity of 1 for each serialized item, you can enter the serial numbers manually in the Serial No field for each item.
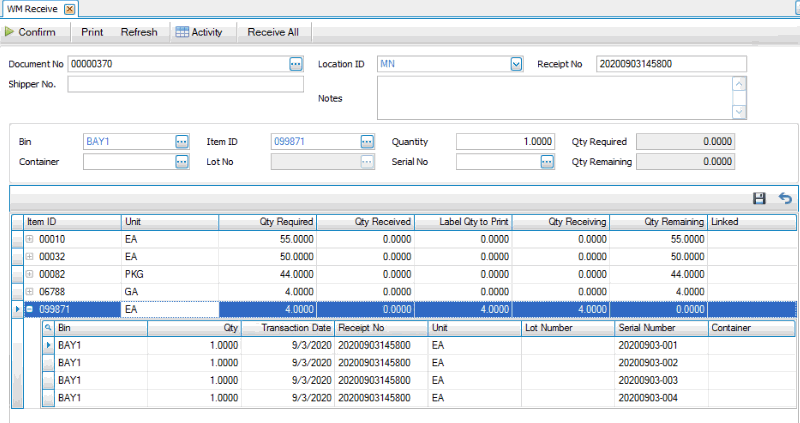
- If you are receive more than a quantity of 1 serialized item, the serial numbers will appear in a child grid of the item. If you are receiving the items singly, click Save after each item. The serial number(s) appear in a child grid of the item.
- Repeat these steps for each serialized item you are receiving.
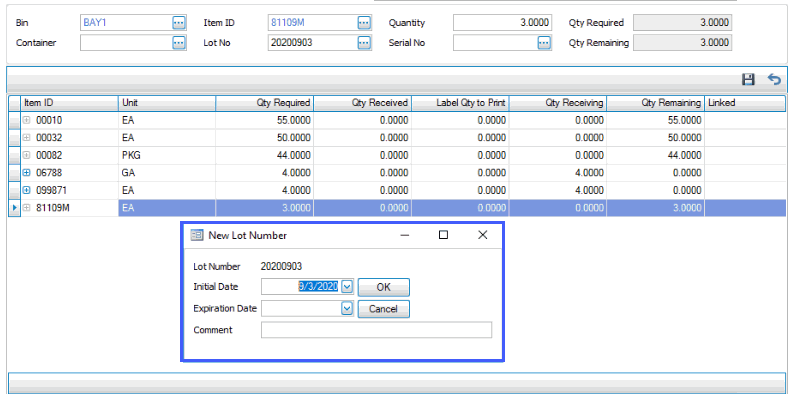
Lotted Item
- Enter or select the Lot No for the item received.
- If you enter a new lot number, the New Lot Number dialog box will appear.
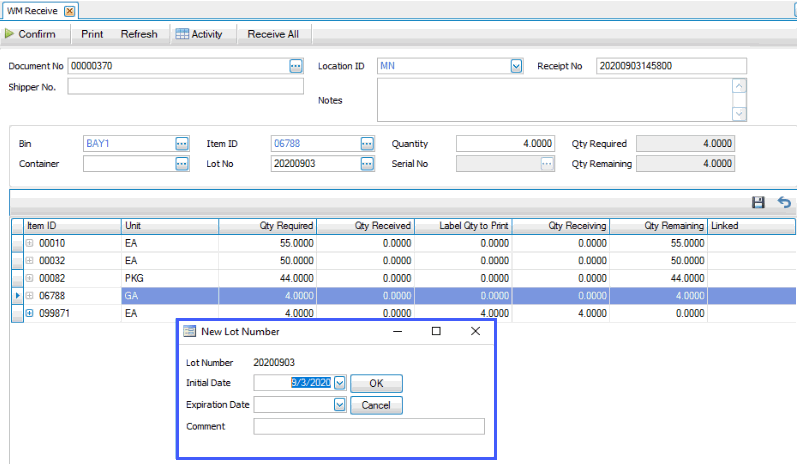
Enter an Expiration Date and/or a Comment, as applicable.
Click OK to return to the Receive screen.
- Click Save. The lot number appears in a child grid of the item.
- Repeat these steps for each lotted item.
Serialized and Lotted
- Enter or select the Lot No for the item received.
- If you enter a new lot number, the New Lot Number dialog box will appear.
Enter an Expiration Date and/or a Comment, as applicable.
Click OK to return to the Receive screen.
- Enter the Serial No for the item received. If you want to enter each serial number manually, change the receiving quantity to 1. If you are receiving more than one serialized item, enter a beginning serial number into the Serial No field and click Save. The Generate Serial Number screen will appear and allow you to view the serial numbers the system will generate. Make any edits and evaluate the serial numbers to ensure the numbers are acceptable, then use the Generate button to create serial numbers for the items you are receiving.
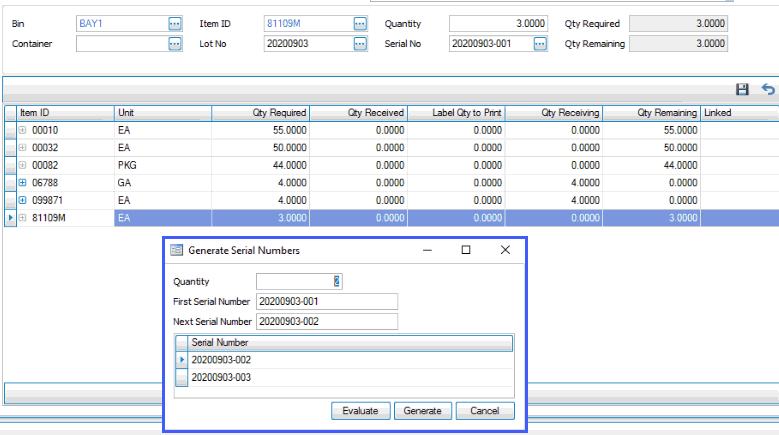
- The lot number/serial number appears in a child grid of the item.

- Repeat these steps for each lotted and serialized item.
- Enter the Serial No for the item received. If there is more than one serialized item to receive, once you enter a serial number, the Generate Serial Numbers screen will open and suggest the next serial numbers in sequence. Accept or edit the First Serial Number, and use the Evaluate button to see the resulting serial numbers generated. If the serial numbers are acceptable, use the Generate button to create and assign serial numbers to the items you are receiving.
- Click Save. The bin and quantity you are receiving will appear in a child grid of the item you are receiving. You must Save item(s) before you can confirm them.
- You may see a pop-up notification box asking if you want to print the total number of labels. Select 'Yes' or 'No' as appropriate. Alternately, enter or select the number of labels you want to print in the Labels Qty to Print column. Press the Print button to print receiving labels for the order items.
- Repeat Steps 4 through 12 for each item you are receiving. Alternately, use the Receive All button to receive all items listed.
- Click the Confirm button to approve your entries and update inventory item quantities and the transaction status, and also update the status and received quantities to the Shipment. The Receive Goods Confirm Log will appear once the confirm process is complete, as well as a dialog box.
When you have finished receiving items, click Confirm. A dialog box will appear with a check box for Receive and Putaway Together.
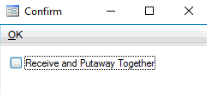
If you mark the Receive and Putaway Together check box, the items you are receiving will be put directly into stock, in the bins specified on the Receive screen. If you clear the check box, the items you are receiving will be moved into a receiving bin (which may not be a receiving-type bin). Click OK to continue.
- After the confirm process, if you left the Receive and Putaway Together check box blank, use the Put Away function to put the items into stock.
- Use the Clear button to clear the fields.